Installing tubings in a tight space can be a challenging yet rewarding task, especially in industries where precision and efficiency are paramount. As a seasoned supplier of Tubings & Tubing Parts, I've encountered numerous scenarios where customers needed guidance on this very topic. In this blog, I'll share some valuable insights and practical tips on how to install tubings in a tight space effectively.
Understanding the Challenges
Before diving into the installation process, it's crucial to understand the challenges associated with working in a tight space. Limited access, restricted maneuverability, and potential interference with other components can make the task daunting. However, with the right approach and tools, these challenges can be overcome.
One of the primary challenges is ensuring proper alignment of the tubings. In a tight space, it can be difficult to position the tubings accurately, which can lead to leaks, reduced flow, or even damage to the tubings. Additionally, accessing the connection points may require special tools or techniques to ensure a secure and leak-free installation.
Another challenge is dealing with the physical constraints of the space. Tight corners, narrow gaps, and limited clearance can make it challenging to manipulate the tubings and tools. This requires careful planning and the use of flexible or compact tools that can navigate the tight spaces.
Planning the Installation
Proper planning is the key to a successful tubing installation in a tight space. Here are some steps to consider:
1. Assess the Space
Before starting the installation, thoroughly assess the space where the tubings will be installed. Measure the dimensions, identify any obstacles or potential interference points, and determine the best route for the tubings. This will help you choose the appropriate tubing size, type, and installation method.
2. Select the Right Tubings and Fittings
Based on the requirements of your application and the space constraints, select the appropriate tubings and fittings. Consider factors such as material compatibility, pressure rating, flexibility, and ease of installation. For example, in a tight space, flexible tubings may be more suitable as they can be bent and maneuvered more easily.
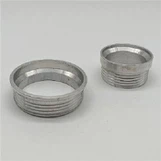
We offer a wide range of high-quality tubings and tubing parts, including Head Tube Cups, Titainium Gr9 Seamless Tubing, and Titanium Head Tubes. These products are designed to meet the highest standards of quality and performance, making them ideal for use in tight spaces.
3. Create a Detailed Installation Plan
Once you have assessed the space and selected the appropriate tubings and fittings, create a detailed installation plan. This plan should include the following:
- A diagram or sketch of the tubing layout, indicating the route, connection points, and any bends or curves.
- A list of the tools and materials required for the installation.
- A step-by-step installation procedure, including any special instructions or precautions.
4. Gather the Necessary Tools
Before starting the installation, gather all the necessary tools. Some common tools used for tubing installation in tight spaces include:
- Tube cutters: These are used to cut the tubings to the desired length.
- Benders: Benders are used to bend the tubings to the required shape.
- Wrenches and pliers: These tools are used to tighten the fittings and connections.
- Sealants and adhesives: Sealants and adhesives are used to ensure a leak-free connection.
- Inspection mirrors and cameras: These tools can be used to inspect hard-to-reach areas and ensure proper installation.
Installation Techniques
Once you have completed the planning phase and gathered the necessary tools, it's time to start the installation. Here are some techniques to consider:
1. Pre-Assemble the Tubings
Whenever possible, pre-assemble the tubings outside of the tight space. This will allow you to work in a more comfortable and accessible environment and ensure that the tubings are properly aligned and connected before installing them in the final location.
2. Use Flexible Tubings
Flexible tubings are easier to maneuver in tight spaces compared to rigid tubings. They can be bent and shaped to fit around obstacles and through narrow gaps. Consider using flexible tubings such as nylon, polyethylene, or PTFE tubings for applications in tight spaces.
3. Employ Right-Angle Fittings
Right-angle fittings can be used to change the direction of the tubings without taking up too much space. These fittings are available in various sizes and materials and can be used to create a more compact and efficient tubing layout.
4. Utilize Extension Tools
Extension tools such as long-handled wrenches, pliers, and screwdrivers can be used to reach connection points in hard-to-reach areas. These tools allow you to apply the necessary torque and force without having to physically access the connection point.
5. Install in Sections
If the tubing installation is complex or involves a long run, consider installing the tubings in sections. This will make the installation process more manageable and allow you to troubleshoot any issues more easily.
6. Ensure Proper Support
Proper support is essential to prevent the tubings from sagging or vibrating, which can lead to leaks or damage. Use clamps, brackets, or hangers to support the tubings at regular intervals and ensure that they are securely fastened.
Testing and Inspection
After the installation is complete, it's important to test the tubings to ensure that they are functioning properly and there are no leaks. Here are some steps to follow:
1. Pressure Test
Perform a pressure test on the tubings to check for leaks. This involves pressurizing the tubings to the recommended operating pressure and monitoring for any pressure drops or signs of leakage.
2. Visual Inspection
Conduct a visual inspection of the tubings and connections to ensure that they are properly installed and there are no visible signs of damage or wear. Look for any loose fittings, cracks, or other defects that may affect the performance of the tubings.
3. Function Test
If applicable, perform a function test on the system to ensure that the tubings are delivering the required flow and pressure. This may involve running the system and monitoring the performance of the components connected to the tubings.
Conclusion
Installing tubings in a tight space requires careful planning, the right tools, and proper techniques. By following the tips and guidelines outlined in this blog, you can overcome the challenges associated with working in a tight space and ensure a successful tubing installation.
As a leading supplier of Tubings & Tubing Parts, we are committed to providing our customers with high-quality products and expert advice. If you have any questions or need assistance with your tubing installation, please don't hesitate to contact us. We are here to help you find the best solutions for your specific needs.


References
- "Tubing Installation Guide," Industry Standard Publication
- "Best Practices for Working in Tight Spaces," Engineering Journal
- "Flexible Tubing Applications," Technical Manual