Hey there, fellow cycling enthusiasts! I'm stoked to share with you my experience and insights on how to install a BB30 Press Fit Shell with a power meter. As a supplier of BB30 Press Fit Shells, I've seen firsthand the importance of a proper installation for optimal performance. So, let's dive right in!
What is a BB30 Press Fit Shell?
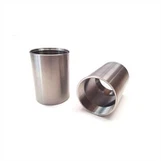
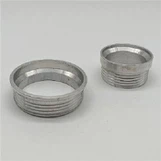
Before we get into the installation process, let's quickly go over what a BB30 Press Fit Shell is. The BB30 standard is a bottom bracket system that uses a 30mm diameter spindle and a press-fit shell. This design offers several advantages, including increased stiffness, reduced weight, and improved power transfer. The press-fit design means that the shell is pressed directly into the frame without the need for threads, which can simplify the installation process.


Why Use a Power Meter?
A power meter is a device that measures the power output of a cyclist. It provides valuable data on how hard you're working, allowing you to train more effectively and improve your performance. By combining a BB30 Press Fit Shell with a power meter, you can get accurate power measurements right at the source - the bottom bracket. This setup is popular among serious cyclists and triathletes who want to take their training to the next level.
Tools and Materials You'll Need
- BB30 Press Fit Shell: Of course, you'll need the shell itself. You can find high-quality BB30 Press Fit Shells on our website BB30 Press Fit Shell.
- Power Meter: Make sure you choose a power meter that is compatible with the BB30 standard.
- Press Tool: A press tool is essential for installing the BB30 Press Fit Shell. You can find specialized press tools at your local bike shop or online.
- Grease: Apply a thin layer of grease to the outside of the shell to make the installation easier and prevent damage to the frame.
- Measuring Tools: You'll need a caliper or a ruler to ensure that the shell is installed at the correct depth and alignment.
- Safety Gear: Wear gloves and safety glasses to protect yourself during the installation process.
Step-by-Step Installation Guide
Step 1: Prepare the Frame
- Clean the bottom bracket area of the frame thoroughly to remove any dirt, debris, or old grease.
- Use a caliper to measure the inside diameter of the bottom bracket shell in the frame. The BB30 Press Fit Shell should fit snugly, but not too tightly. If the frame is too tight, you may need to ream it to the correct size.
Step 2: Prepare the BB30 Press Fit Shell
- Apply a thin layer of grease to the outside of the BB30 Press Fit Shell. This will help the shell slide into the frame more easily and prevent it from getting stuck.
- Check the power meter for any installation instructions or specific requirements. Some power meters may need to be installed before the shell is pressed into the frame.
Step 3: Install the Power Meter (if required)
- Follow the manufacturer's instructions to install the power meter onto the BB30 spindle. This may involve attaching sensors, wiring, or other components.
- Make sure the power meter is properly aligned and tightened to the correct torque specifications.
Step 4: Press the BB30 Press Fit Shell into the Frame
- Place the BB30 Press Fit Shell into the press tool, making sure it is centered and aligned correctly.
- Position the press tool over the bottom bracket area of the frame and slowly start to apply pressure. Use a steady, even force to press the shell into the frame until it is fully seated.
- Check the alignment of the shell using a measuring tool. The shell should be parallel to the frame and centered within the bottom bracket area.
Step 5: Check the Installation
- Once the shell is installed, use a caliper to measure the depth of the shell in the frame. The depth should be within the manufacturer's specifications.
- Check the alignment of the power meter and make sure it is functioning properly. You can do this by connecting the power meter to a compatible device, such as a cycling computer or a smartphone app.
Step 6: Finalize the Installation
- Tighten any remaining bolts or fasteners to the correct torque specifications.
- Reinstall the crankset and pedals onto the bottom bracket spindle.
- Test ride the bike to make sure everything is working correctly. Pay attention to any unusual noises or vibrations, which could indicate a problem with the installation.
Tips and Tricks
- Take your time: Installing a BB30 Press Fit Shell with a power meter is a precise process that requires patience and attention to detail. Don't rush through the steps, and make sure you double-check your work at each stage.
- Use the right tools: Investing in high-quality tools will make the installation process easier and more accurate. A good press tool and measuring tools are essential for a successful installation.
- Follow the manufacturer's instructions: Each BB30 Press Fit Shell and power meter may have specific installation instructions and requirements. Make sure you read and follow these instructions carefully to avoid any problems.
- Seek professional help if needed: If you're not confident in your ability to install the BB30 Press Fit Shell and power meter yourself, don't hesitate to seek help from a professional bike mechanic. They have the experience and expertise to ensure a proper installation.
Conclusion
Installing a BB30 Press Fit Shell with a power meter can be a challenging but rewarding process. By following the steps outlined in this guide and using the right tools and materials, you can ensure a successful installation and enjoy the benefits of accurate power measurements. If you have any questions or need further assistance, feel free to reach out to us. We're here to help you get the most out of your cycling experience.
If you're interested in purchasing a BB30 Press Fit Shell or other bicycle frame building parts, such as Head Tube Cups or Titainium Gr9 Seamless Tubing, visit our website or contact us to start a purchase negotiation. We look forward to working with you!
References
- Bicycle Mechanics Manuals
- Manufacturer's Installation Guides for BB30 Press Fit Shells and Power Meters